We live and work in a time where collaboration across company borders is part of our day-to-day for most of us. This leads to a whole number of challenges regarding the management of “outside” identities in the tenant. Today I want to focus on a quick win that can help you get significantly more control with very little configuration. Let’s go!
What are terms of use?
Terms of use (TOU) describe an agreement that a user has to confirm and respect to use a service. In our case we want to use them to set up clear expectations of what kind of behavior is allowed for guests in our tenant and to communicate a set of rules (e.g. an NDA) if applicable.
Why should I care?
For the worst case scenario: A record of a guest user having agreed to the TOU will make your attorney’s job much easier in case they were to act against the agreement…
If you happen to be faced with significant resistance inside your company when trying to open up for working with guests (e.g., from an IT department that is afraid of losing control of their perimeter), this feature can help you significantly soften this argument. I’m not going to dive into Change Management too much at this point, but just this: The resistance you are facing is most likely coming from fear – help your colleagues feel safe and you’ll be surprised by how much you can do together!
What will be covered in this article?
We will create a Conditional Access policy to prompt all guest users with TOU and request confirmation from them. Scoping the policy to different business partners or adding TOUs in different languages is not covered to keep it at an entry level for now. This is intentionally not a deep dive but a quick glimpse at what is available.
What are the prerequisites?
- To start deploying this, you will need a TOU document in PDF format that you can show to guests. If you’re in a sufficiently large company and have your own legal department, it would be best to ask them – if not, you might need to ask around a bit.
- To use Conditional Access, your users need to be licensed with Business Premium or at least AAD P1.
How do I create the policy?
- Use this link or navigate to AAD Portal > Azure Active Directory > Security > Conditional Access > Terms of use.
- Select “+ New terms”.
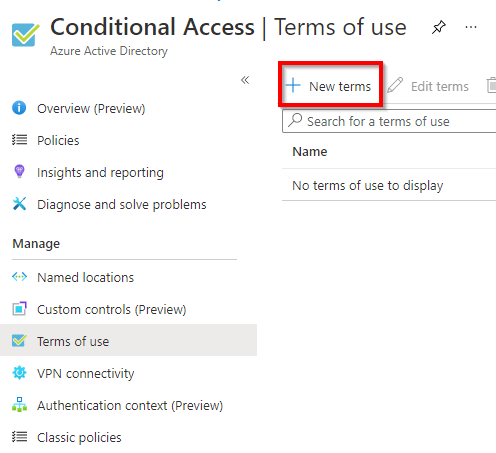
- Give your TOU a name (this will only be visible to administrators).
- Upload your TOU PDF file by selecting the folder button.
- Select a language from the dropdown.
- Give your document a display name (this will be visible to guests).

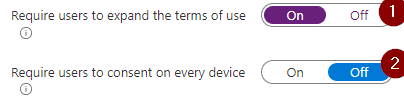
- Decide if users must expand the TOU to accept them. Do you want guests to be able to just click “accept” without reading the TOU?
- Decide if you require approval of the TOU once for every guest – regardless of the device they are coming from – or once for every device they use to access your data.
- Next, choose the appropriate expiry settings – there’s three options:
- Option 1: You can require your guests to confirm the TOU in a moving time-window always x days after the last confirmation.
To do so, you would leave “Expire consents” off and enter an appropriate duration in the field below.
(This is the option I’m using for this scenario.)

- Option 2: You can expire consent on a fixed schedule.
To do so, you would set “Expire consents” to “On”, enter a start date and set “Frequency” to an appropriate value. “Duration before re-acceptance required” would be left empty in this scenario.
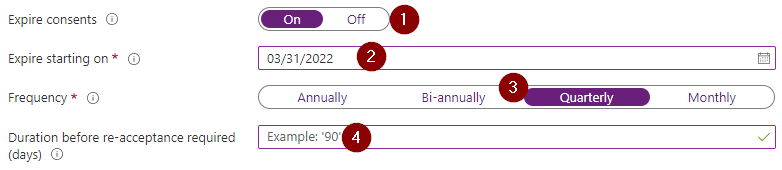
- Option 3: You can actually combine the two previous options. This gets complicated quickly and I’ve yet to see a valid use-case for this, so I’ll not go into it here.
- In the “Conditional Access” section choose “Custom policy” – this will allow you to create the required policy right away.

- Select “Create” and off you go to the policy 🚀
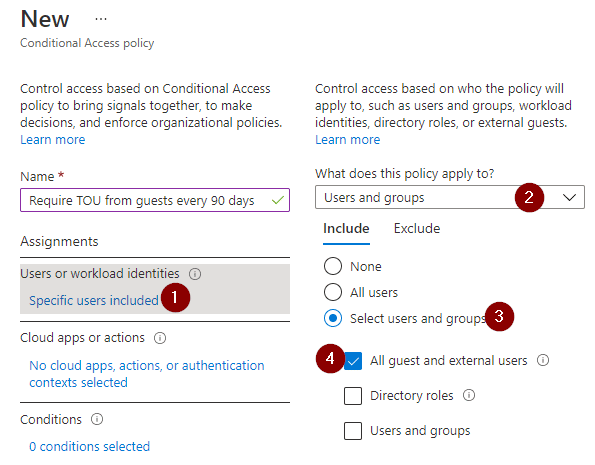
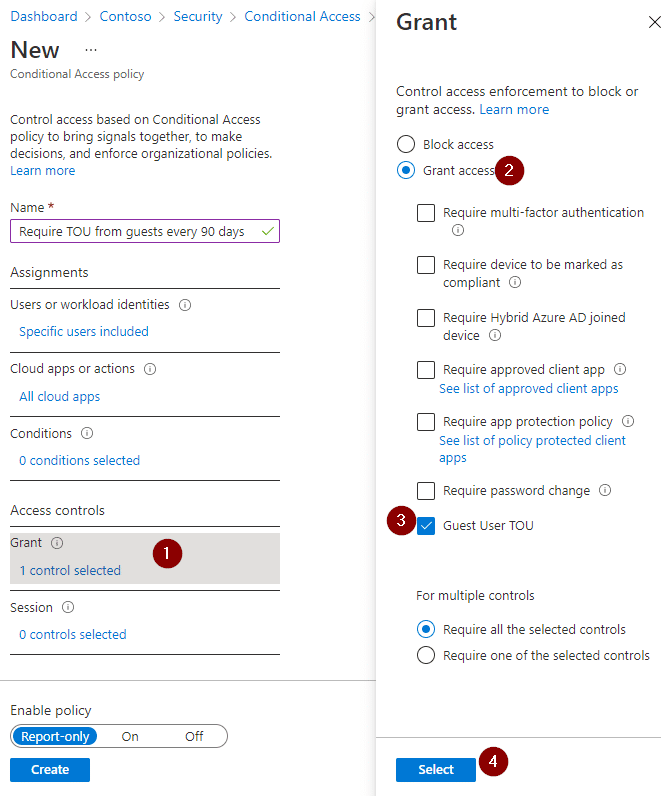
We will be setting up an absolutely minimalistic Conditional Access Policy here, since this is not the focus. Be aware that you can put a lot of thought and complexity into Conditional Access. To keep it simple for now, what we want to do: Require TOU from every guest, no matter what they sign into or where they are coming from. - Set a name that tells your colleagues what the policy does.

- Select “Users or workload identities” under “Assignments”.
- Make sure to set the policy to apply to “Users and groups”.
- Under “Include” choose “Select users and groups”.
- Select “All guests and external users”.
- Select “Cloud apps or actions” under “Assignments”.
- Make sure to set the policy to apply to “Cloud apps”
- Under “Include” choose “All cloud apps”.

- Select “Grant” under “Access controls”.
- Make sure “Grant access” is selected in the panel.
- Check the box next to your newly created TOU.
- Confirm by clicking “Select”.
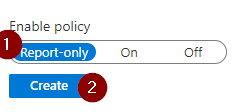
- Decide if you want to leave the policy in Report-only mode for now or if you want to turn it on right away. I’d recommend leaving it in report-only and taking a look at the logs for the next few days to see who would have been prompted with the TOU if the policy were on – but if you like to live dangerously, I can’t stop you 😉
(This whole “report-only and finding out who a policy applied to”-topic is out of scope for now, but let me know if you’re interested, I might write a short article on it in the future.) - Click “Create”.
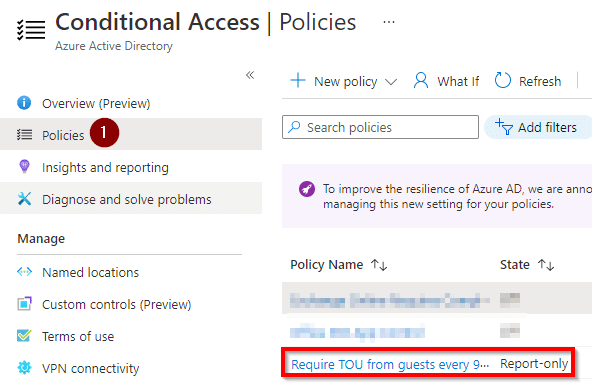
- Confirm that your policy is there by navigating to the “Policies” and checking the list (twice).
What now?
- Review the logs and decide if you need more finetuning before turning the policy on.
- Consider adding different TOUs for different user groups – depending on what they do and access.
- Consider adding additional languages to your TOU to cover your international guests.
- Enjoy your worry-free collaboration.
What does it look like for the guests?
Good question! Let me show you:
- Let me access a team I’ve been invited to.

- Oh no – I actually have to read the TOU! (just like we planned 😁)
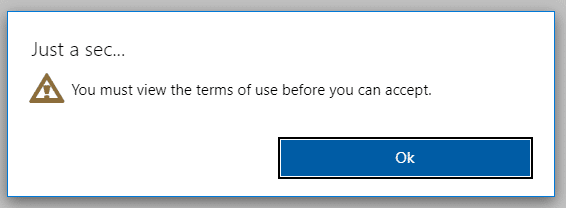
- Well, ok. Let me expand and read them, before I accept…

- I’m in!
- In 90 days, I will get the same prompt again and you can sleep tight knowing that you’ve successfully implemented TOU for all your guest users in just a few minutes of work.
How do I know who accepted and who declined?
- I’m not going to go into reporting right now, but if you navigate to your TOU, you can see the numbers of “Accepted” and “Declined” have updated.

- When you click on the number, it takes you to a list of all accepted/declined TOUs including users and timestamps.
Questions?
If anything is unclear or you are interested in one of the things I left out here, let me know. You might be just the motivation I need to write another article 😉
I’m going to be honest – comments on blogs are not really on my radar usually. I’d recommend trying Twitter: @considerITman